Unleashing gRPC Part 1: Getting Started with Machine Control Using Flutter and gRPC
 By Blake Lapum| Senior Software Engineer |
In complex software systems, creating the right separation of concerns without making things overly complicated is always a hard balance to strike. In traditional embedded systems that run on a Real-Time-Operating-System (RTOS) or bare metal, we don’t often have a lot of options of how to separate out logical processes. However, as more embedded systems move to embedded Linux, the options increase dramatically. In this two-part blog series, we will explore one pattern that has worked particularly well for us on embedded Linux systems by walking through a life-like example. Not unlike our web counterparts, we’ll demonstrate something akin to a backend and frontend stack that solves a few key problems including:
- Race conditions between multiple actors
- Keeping everyone in sync
- Concrete interface definitions
In the following sections, we will walk through an example Proof of Concept (PoC) for a smart light system, including software architecture and an actual implementation.
A Little Background
Before we delve too deeply into our smart light system example, we need first to understand the technologies we will be looking at and working with.
Google’s Remote Procedure Call (gRPC) is a framework that can run in any environment to connect devices or services whether it be across a house or across the world. gRPC is supported in a number of languages with more languages being implemented as I write this in 2024. gRPC is also supported cross-language; that is, the backend server can be written in languages such as C++ or C# even if the frontend client is written in Flutter, Swift, or Kotlin! Under the hood, gRPC uses protocol buffers as both the interface definition language and the underlying message serialization technology. In the simplest of terms, gRPC is a framework that can be used to call into remote functions defined elsewhere while enforcing a strict interface definition.

Flutter is an open-sourced Google framework that utilizes the Dart programming language to build fast, performant, beautiful, natively compiled applications. With support for iOS, Android, Windows, Linux, and Web, Flutter is very quickly becoming a SpinDance go-to wherever UI is involved. It is also worth noting that, not only does Flutter run on Linux desktop, but Flutter can also be used in an embedded Linux environment. For a deeper understanding of what it means to run Flutter in an embedded Linux environment, see our Getting Started with Flutter for Embedded Linux blog post.
 While it is not the primary focus of this blog, Yocto / Poky / bitbake will also be referenced. Without getting into too much detail (that would be an entire blog post in itself), Yocto is the collaborative project we will be using to create the embedded Linux operating system our light system will be living on. Yocto enables us to pull in standard Linux tooling, packages, and the kernel, while also giving us the ability to build and deploy the Flutter applications for the target hardware.
Diving In
Now that we have laid out some context around the technology stack we will be using in our IoT light system example, it is time to get started with what an example implementation of a PoC of this system could actually look like.
System Architecture
Because this is just a PoC, we will be focusing more on the basics of Flutter and gRPC and how this stack can be used to implement a modular system to control a single LED
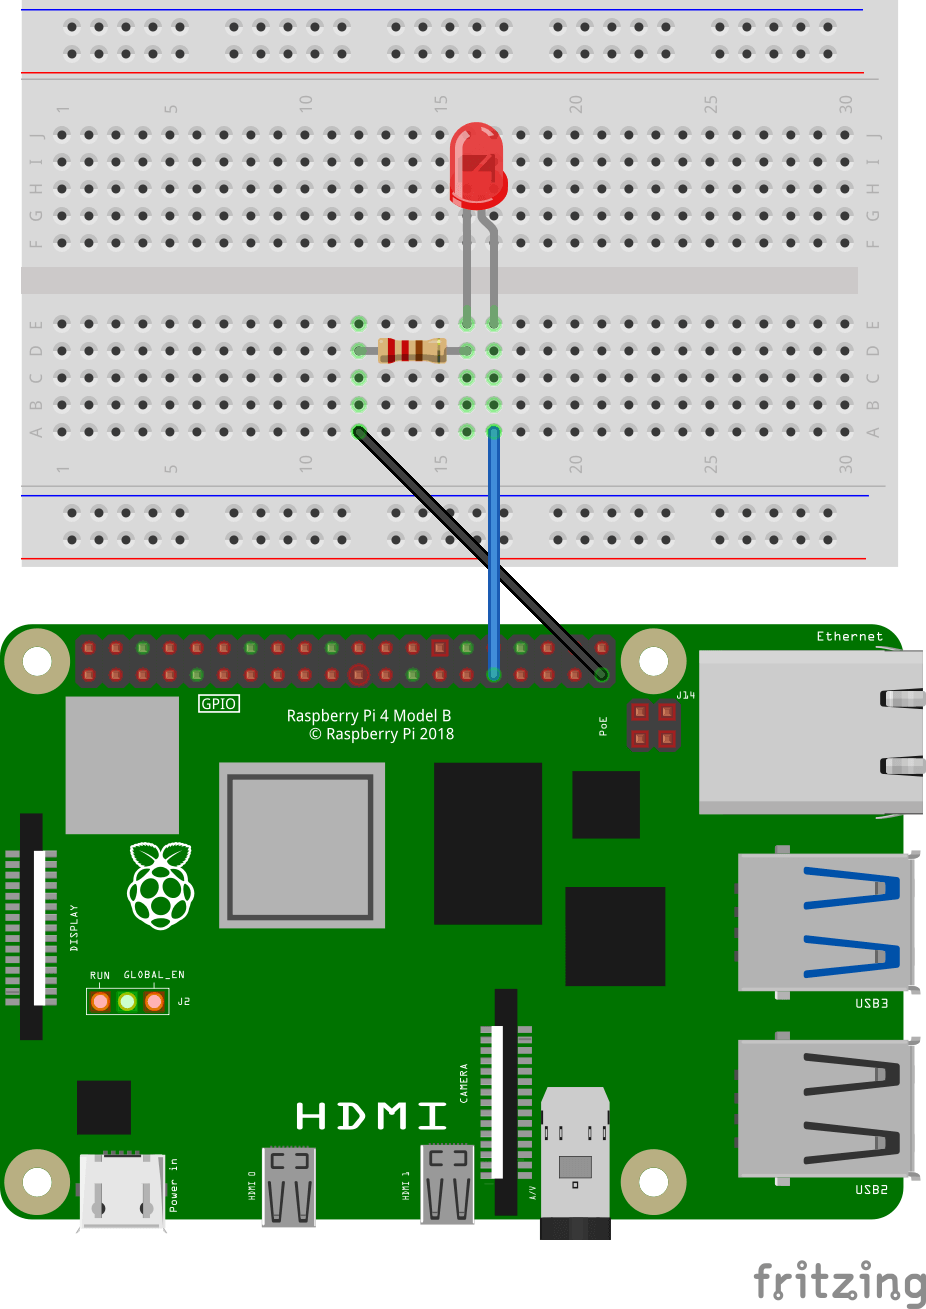
For this PoC we will be using a Raspberry Pi 4b Single Board Computer (SBC), an HDMI-enabled display, and a simple 5mm LED.
The software architecture itself is simple and modular:
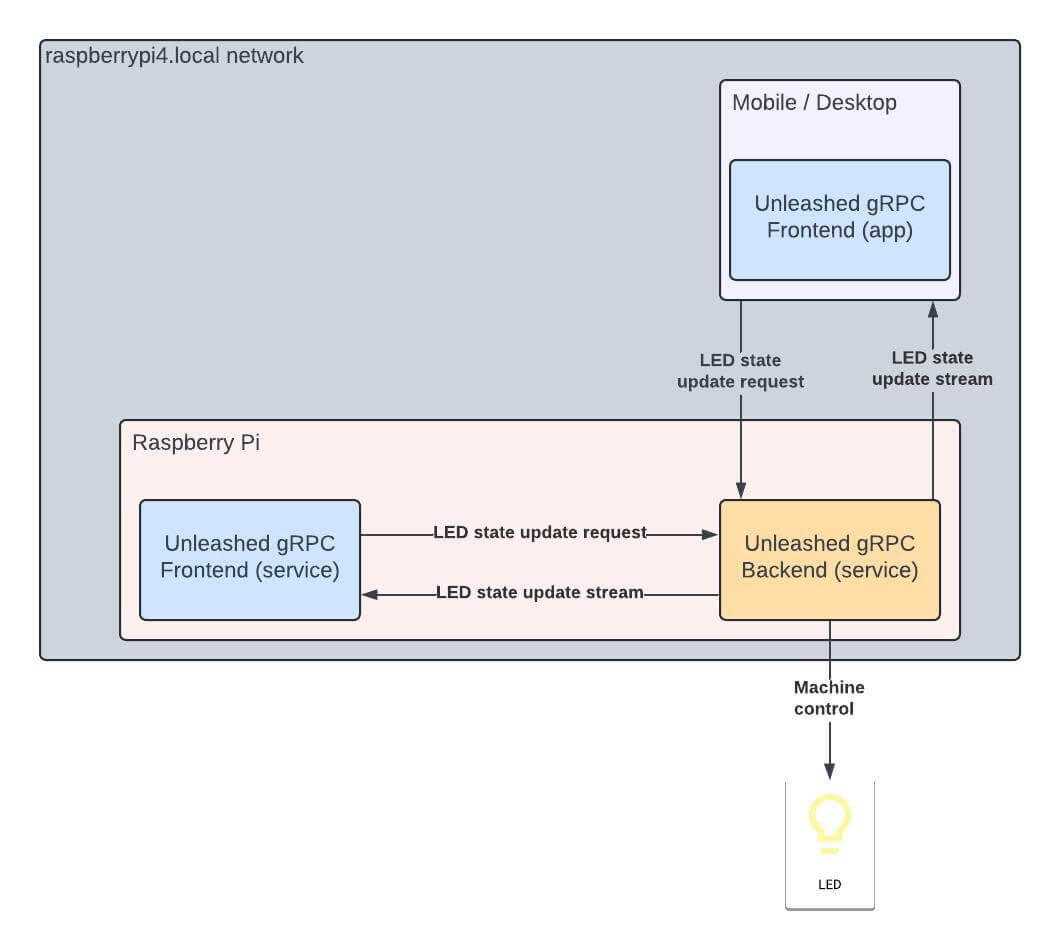
Although simple, the modularity of the system is extremely important – each application or service has one job:
- Backend gRPC server service: the executor. Every machine control request is filtered and executed in sequential order based on gRPC calls, removing hardware race conditions and ensuring the machine is controlled by a single request at any given time. Internally, event driven architecture enables LED state events to be picked up and streamed to any listening clients.
- Frontend gRPC client application(s): The requestor. Allows users to make requests to update the state of the LED by invoking the gRPC service functions. State is not locally maintained, but updated based on the event stream coming from the backend gRPC server.
On the Raspberry Pi side of things, we are running a custom embedded Linux OS that serves three primary purposes:
- Connect to wifi (or ethernet) so we have an IP (or alias) to serve our gRPC server on
- Spins up the
unleashing-grpc-backend.servicethat serves on the$(hostname).localIP alias - Spins up the
unleashing-grpc-frontend.servicethat can be physically interacted with to update the LED state
File Structure
For a system that has a shared interface contract that is used in multiple applications, our file structure will look like:
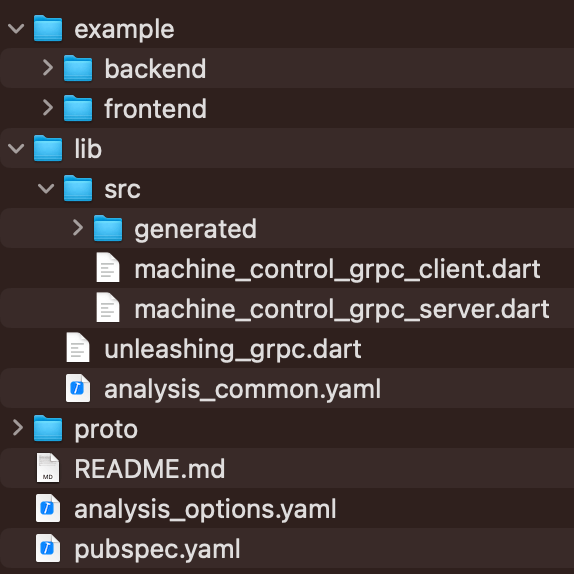
The top-level Flutter code should be created as a Flutter Package. Creating the top-level code as a package means there is no main entry point – it is a library that can be used wherever need be. There are multiple files and directories that also get generated, but the important ones to focus on are:
lib/: all the library Dart code lives herelib/src/: Dart code that is internal to the librarylib/src/generated/: Generated protocol buffer Dart code
lib/unleashing_grpc.dart: the library definition which exports classes and functionality available for consumption
proto/: our protocol buffer declarations (gRPC interface definition)pubspec.yaml: where package dependencies and metadata is definedexample/: our consumingfrontend/andbackend/Flutter applications. Once we were to move out of the PoC phase it may make sense to create separate repositories for our front and backend applications, but it is always a good idea to have example projects that help users understand how a library can and/or should be used.
Interface Design and Code Generation
Now that we understand the basic layout of the project, let’s dive into some code. The first step is to design our interface definition, which is done by defining .proto file(s). Since we already know the file structure of the library, all the .proto files can be added to the proto/ directory.
The requirements state the user-interfacing applications need to be able to set the LED state and get state updates, so the following can be defined:
# The proto syntax to use.
syntax = "proto3";

# The package name (which can be used if we need to include this proto in another proto).
package machine_control;

// The MachineControl service provides methods for controlling the machine via gRPC.
service MachineControl {
  // Set the state of the LED.
  rpc SetLedState(LedState) returns (Empty) {}

  // Stream the active state of the LED.
  rpc StreamLedState(Empty) returns (stream LedState) {}
}

// An empty message. Ideally this would be a google.protobuf.Empty, but it is not available for Dart code generation.
message Empty {}

// Request message for SetLedState.
message LedState {
  // The state to set the LED to.
  bool ledOn = 1;
}
While the entirety of the proto file is important, the piece to call out is our service MachineControl - this block is what actually defines what RPC calls will be available to the client. In our case, there exists a SetLedState function that takes in an LedState object to update the state of the LED, and we also have one StreamLedState function that, when called, returns a stream of LED state updates.
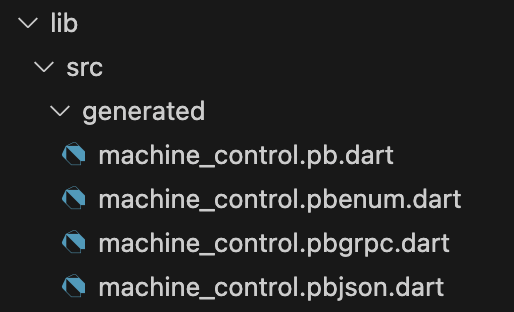
With the interface defined, it is time to generate some Dart code. To do this, the protoc Dart plugin will need to be installed. Once installation is complete, the following command can be executed to generate the Dart files into lib/src/generated:
protoc --dart_out=grpc:lib/src/generated -Iproto/ proto/*.proto
Once the command completes successfully, the protocol buffer Dart code should be generated with a file structure that looks like:
The gRPC Server
Now that we are happy with our interface definition and the Dart protocol buffer files have been generated, it is time to create the gRPC server class. The server class is what our backend/ application will spin up during its initialization process. Lucky for us, gRPC provides a grpc package that is compatible with all of Flutter’s supported platforms. This means that all we need to do is create a thin wrapper around the Server class to safety-guard our calling applications:
import 'package:grpc/grpc.dart';


import 'generated/machine_control.pbgrpc.dart';


class MachineControlGrpcServer {
 late final Server _server;


 /// The hostname of the gRPC server.
 final String hostname;


 /// The port of the gRPC server.
 final int port;


 /// The implementation of [MachineControlServiceBase] to register with the
 /// server.
 final MachineControlServiceBase service;


 MachineControlGrpcServer({
   required this.service,
   this.hostname = 'localhost',
   this.port = 8080,
 }) {
   _server = Server.create(services: <Service>[service]);
 }


 /// Start the gRPC server.
 Future<void> start() async {
   await _server.serve(
     address: hostname,
     port: port,
   );
 }


 /// Stop the gRPC server.
 Future<void> stop() async {
   await _server.shutdown();
 }
}
Although there is not all that much going on, this thin server wrapper guarantees we will be spinning up exactly one fully-implemented MachineControlServiceBase, which is the base class that must be extended and implemented somewhere.
The gRPC Client
It would not be very kind to only help out the application serving the gRPC server, so we will help out the consuming client application by creating a gRPC client class. Similarly to how the Dart grpc package exports a Server class, they have also created and exported a Client class. The wrapper around the Client class is going to be a little bit more interesting:
import 'package:grpc/grpc.dart';


import 'generated/machine_control.pbgrpc.dart';


class MachineControlGrpcClient {
 /// The stub ('client') to call into.
 late final MachineControlClient _stub;


 /// The hostname of the gRPC server.
 final String hostname;


 /// The port of the gRPC server.
 final int port;


 MachineControlGrpcClient({
   this.hostname = 'localhost',
   this.port = 8080,
 }) {
   _stub = MachineControlClient(
     ClientChannel(
       hostname,
       port: port,
       options: const ChannelOptions(
         credentials: ChannelCredentials.insecure(),
       ),
     ),
   );
 }


 /// Set the [ledOn] state to on ([true]) or off ([false]).
 Future<void> setLedState(final bool ledOn) async {
   await _stub.setLedState(LedState(ledOn: ledOn));
 }


 /// Stream the LED status.
 Stream<LedState> streamLedState() async* {
   yield* _stub.streamLedState(Empty());
 }
}
The generated machine_control.pbgrpc.dart creates a “stub” (which really just equates to an internal client interface) to define our service functions. That said, we are free and clear to make the client calls as simple as possible by wrapping around our internal _stub and transforming the input parameters how we see fit. This is a very simple interface and use case, but organizing your gRPC client in this way really comes in handy when the data being passed becomes more complex. It also helps to organize a single gRPC client this way if you have multiple services defined so everything is nice and organized.
Up Next
Our library is now complete and ready to be utilized! Stay tuned for the second part of this blog series where we will dive deeper into the PoC and write both frontend and backend applications to utilize our new library!