Choosing the Right Espressif Part for Your IoT Product
By Rocky Sherriff | Principal Software Engineer
So you’re starting a new IoT project and you have some freedom to choose your hardware. That’s both thrilling and terrifying – there are a lot of options out there! One good place to start for many IoT products might be the Espressif product line. They offer a wide range of radios and processors along with a mature software framework that is largely portable across their line. That sounds like a good place to start, right? So you head on over to the Espressif site and start considering your options. And suddenly you’re faced with information overload. There’s a huge variety of chips, and then there’s even more modules. And once you narrow things down to a module, you still have options on which devkit to use for early development. Not to add any pressure, but choosing the right ESP32 devkit for prototyping your project is crucial, as it determines not only the speed and ease of development but also impacts product development schedules, costs, and the ability to quickly prototype essential features.
In case you haven’t already found them, here are the main Espressif pages for selecting chips, modules, and devkits.
- ESP SoC Comparison Table – lists all the major chips and their variants for each chip series. You can get the datasheet for each chip by clicking on the link under its image. The table includes some high-level chip characteristics and a coarse mapping to modules and devkits.
- ESP Module Comparison Table – lists all the modules for each chip series. You can get the datasheet for each module by clicking on the link under its image. The table includes some high-level module characteristics and a coarse mapping to chip variants and devkits.
- ESP Devkit Comparison Table – lists all the devkits for each chip series. You can get the datasheet for each devkit by clicking on the link under its image. The table includes a high-level description of the devkit’s purpose and peripherals and lists modules that can be used on the devkit.
There’s great information in here, but interpreting all these tables comes with a learning curve. This blog doesn’t take the place of reading those pages, but hopefully it can provide some guidance on navigating that thicket of information more quickly. By the end of this short read, you should
- Know how to navigate the Espressif SoC, Module, and Devkit pages and find chip and module datasheets.
- Be able to connect the dots between that table content and the more detailed information inside the Espressif SoC and Module datasheets.
- Have a simple starting framework for searching among all the alternatives.
Cores vs Modules
The first thing you’ll notice when you’re searching through the Espressif documentation is that they offer both SoCs (aka chips) and modules, with a lot of overlapping capabilities. What’s the difference? Well at a high level, a chip is a single piece of silicon that includes one or more processing cores, a radio, and perhaps some internal flash and pseudo-static RAM (PSRAM). A module is a bigger stand-alone assembly that includes a chip already wired to other parts like antennas, external flash, and external PSRAM.
Why choose a module over a chip for your hardware? The module can provide easier board design and integration, faster radio certification, and reduced time-to-market. But the disadvantage is cost. If you’re expecting high volumes for your product, then it may be worth the extra engineering costs to design your hardware directly with the chips (the so-called “chip-down” approach).
Even if you’re not on the hook to decide chip vs. module, you still need to understand the connection between them so that you can identify appropriate devkits for your development. Later we’ll show how to trace from devkits through modules back to chips and how to fully identify the devkit you’re looking at.
Choosing a Chip
Your first decision centers around selecting an Espressif chip.There are many chip variants, but you can start by narrowing your search to a particular chip series. The choice of chip series will largely be driven by radio requirements. A second consideration will be processing power. Once you narrow the list a bit, you may also need to apply other desiderata like which peripherals are supported, and how many GPIO pins are exposed.
Each chip series includes multiple variants of the chip. These variants may involve different supply voltages or operating temperature ranges, but from our perspective as embedded firmware engineers, the most important variation is in the amount of on-board flash and PSRAM. Here is a table comparing the main features of the different series, summarizing information from the ESP SoC Table. (We ignore the older ESP8266 and ESP868x Series which are largely supplanted by newer options.)
| Chip Series | Active Variants | CPU | Max Clock Speed (MHz) | On-chip Flash Memory (MB) | SRAM (KB) | PSRAM (MB) | Connectivity |
|---|---|---|---|---|---|---|---|
| ESP32 | 3 | Dual-core Xtensa LX6 | 240 | 0, 4, or 8 MB | 520 KB | 0, 2 MB | Wi-Fi (802.11 b/g/n), Bluetooth v4.2 BR/EDR and BLE |
| ESP32-Pico(note 1) | 3 | Dual-core Xtensa LX6 | 240 | 4 or 8 MB | 520 KB | 0, 2 MB | Wi-Fi (802.11 b/g/n), Bluetooth v4.2 BR/EDR and BLE |
| ESP32-S2 | 5
|
Single-core Xtensa LX7 | 240 | 0, 2, or 4 MB | 320 KB | 0, 2 MB | Wi-Fi (802.11 b/g/n) |
| ESP32-S3 | 7 | Dual-core Xtensa LX7 | 240 | 0, 4, or 8 MB | 512 KB | 0, 2, 8, or 16 MB | Wi-Fi (802.11 b/g/n), Bluetooth v5.0 LE |
| ESP32-C6 | 2 | Single-core RISC-V | 160 | 0 or 4 MB | 512 KB | 0 | Wi-Fi 6 (802.11ax) Bluetooth v5.0 LE IEEE 802.15.4 (Zigbee, Thread) |
| ESP32-C3 | 4 | Single-core RISC-V | 160 | 0 (requires external flash), OR 4 MB |
400 KB | 0 | Wi-Fi (802.11 b/g/n), Bluetooth v5.0 LE |
| ESP32-H2 | 2 | Single-core RISC-V |
96 | 2 or 4MB | 320 KB | 2, 4 MB | Bluetooth v5.0 LE IEEE 802.15.4 (Zigbee, Thread) |
| ESP32-P4 | 2 (?) | Single or Dual-core RISC-V | 400 | 0 | 768 KB SRAM | 16, 32 MB | Wi-Fi (802.11 b/g/n), CAN bus Ethernet |
Note 1: ESP32-Pico series is basically the ESP32 series optimized for reduced chip size and power consumption, but offers slightly less flexibility with external flash and peripheral support.
From this table, you can narrow down your chip series options pretty quickly, based primarily on which radios and radio standards are supported. For example, if you need Wi-Fi 6 support, you quickly zero in on the ESP32-C6.
Alternatively, if you only need Wi-Fi 802.11 and BLE v4.2 support, you could select from the ESP32, ESP32-S3, ESP-C3, and ESP-C6l options. You can narrow down this list based on processing power or memory. Increasing either processing power or memory increases chip cost, so you want to be realistic about your needs and only pay for what you need. But you also don’t want to be too restrictive or you may not have the resources you need as feature lists grow or you run into unexpected problems that you have to work around. From these options, you can see the C3 might be the cheapest option if it has the resources you need. On the other hand, if you’re looking for maximum processing power, then it’s probably between the ESP32 and the ESP32-S3. Both have dual Xtensa cores and similar memory resources. But the more modern ESP32-S3 has a bit of an edge since its cores are newer. In the absence of other drivers we tend to settle on the ESP32-S3 as a good general purpose solution.
Once you’ve identified the chip series, you still have to sort through which chip variant best fits your requirements. The high-level tables in the ESP SoC Table summarize the main chip variants within a series. But as high-level summaries, those tables can be ambiguous about which feature combinations are actually available with which chip variants. For example, the ESP32-S3 lists 3 possible flash sizes and 4 possible PSRAM sizes. If every combination were available, that would lead to 12 chip variants. But in fact, only 7 variants are available.
If you need to get definitive answers about chip variants, you should consult the actual datasheet for the chip series. You can find the datasheet for each chip by clicking its link in the ESP SoC Comparison Table. Specifically, you look at Table 1 a few pages into the datasheet, which lists all possible variants explicitly including which combinations of flash size and PSRAM size are available. The table also gets specific about other differences like operating temperature ranges, supply voltage, and pinouts.
Choosing a Module
So you’ve narrowed down your chip selection and it’s time to select a module. This introduces yet more variants, since each module might have one of many chip variants as well as independent options for other external components. And in an additional complication, not every chip variant is available on a module. The two main drivers in selecting a module are available memory (flash and PSRAM) and antenna design. The latter matters for radio performance, but has no impact on firmware development so we will not focus on it here.
The starting point for module selection is the Espressif information in the ESP Module Comparison Table. Each module shows the chip variants that can be included, along with module-specific variations like external flash. The module table is a good summary, but like the chip table, it’s a little ambiguous about which combinations of external flash and chip variants are available. Fortunately, we can piece this together by comparing on-chip flash and PSRAM values from the chip variant data sheets along with the module data sheet. Here is a disambiguated summary of Espressif’s module table focused on memory sizes. (Espressif uses the “U” suffix to indicate an external antenna connection instead of an integrated PCB antenna. We treat all the “U” variants the same as their base e.g. We consider ESP32-S3-WROOM-1 and ESP32-S3-WROOM-1U as identical for firmware purposes).
| Chip Series | Module | Chip Variant | External Flash (MB) |
External PSRAM (MB) | On-chip Flash (MB) | On-chip PSRAM (MB) |
| ESP32-S3 | ESP32-S3-WROOM-1 / -1U | ESP32-S3 | 4, 8, 16 | 0 | 0 | 0 |
| ESP32-S3R2 | 4, 8, 16 | 0 | 0 | 2 | ||
| ESP32-S3R8 | 4, 8, 16 | 0 | 0 | 8 | ||
| ESP32-S3-WROOM-2 | ESP32-S3R8V | 4, 8, 16 | 0 | 0 | 8 | |
| ESP32-S3-MINI-1 / -1U | ESP32-S3FN8 | 0 | 0 | 8 | 0 | |
| ESP32-S3FH4R2 | 0 | 0 | 4 | 2 | ||
| ESP32-S2 | ESP32-S2-MINI-2 / -2U | ESP32-S2FH4 | 0 | 0 | 4 | 0 |
| ESP32-S2FN4R2 | 0 | 0 | 4 | 2 | ||
| ESP32-S2-SOLO-2 / -2U | ESP32-S2 | 4 | 0 | 0 | 0 | |
| ESP32-S2R2 | 4 | 0 | 0 | 2 | ||
| ESP32-C6 | ESP32-C6-MINI-1 / -1U | ESP32-C6FH4 | 0 | 0 | 4 | 0 |
| ESP32-C6-WROOM-1 / -1U | ESP32-C6 | 4, 8, 16 | 0 | 0 | 0 | |
| ESP32-C3 | ESP32-C3-MINI-1 / -1U | ESP32-C3FH4 | 0 | 0 | 4 | 0 |
| ESP32-C3FH4X | 0 | 0 | 4 | 0 | ||
| ESP32-C3-WROOM-02 / -02U | ESP32-C3 | 4 | 0 | 0 | 0 | |
| ESP32-H2 | ESP32-H2-MINI-1 / -1U | ESP32-H2FH2 | 2, 4 | 0 | 2 | 0 |
| ESP32-H2FH4 | 2, 4 | 0 | 4 | 0 | ||
| ESP32-H2-WROOM* (-02C, -03, -07) |
ESP32-H2FH2 | 2, 4 | 0 | 2 | 0 | |
| ESP32-H2FH4 | 2, 4 | 0 | 4 | 0 | ||
| ESP32 | ESP32-WROOM-32E ESP32-WROOM-32UE |
ESP32-D0WD-V3 | 4, 8, 16 | 0 | 0 | 0 |
| ESP32-D0WDR2-V3 | 4, 8, 16 | 0 | 0 | 2 | ||
| ESP32-WROVER-E ESP32-WROVER-IE |
ESP32-D0WD-V3 | 4, 8, 16 | 8 | 0 | 0 | |
| ESP32-D0WDR2-V3 | 4, 8, 16 | 8 | 0 | 2 | ||
| ESP32-MINI-1 / -1U | ESP32-U4WDH | 0 | 0 | 4 | 0 | |
| ESP32-DU1906 / U | ESP32-D0WD-V3 | 8 | 8 | 0 | 0 | |
| ESP32-PICO | ESP32-PICO-MINI-02 / -02U | ESP32-PICO-V3-02 | 0 | 0 | 8 | 2 |
| ESP32-PICO-V3-ZERO | ESP32-PICO-V3 | 0 | 0 | 4 | 0 |
This table should simplify identifying flash and PSRAM options to consider as you finalize your module choice.
ASIDE: In case it’s helpful for your own detailed research, for example if you want to compare features besides memory, here’s how we generated that table.
First we go to the ESP Module Comparison Table to get the list of chip variants for each module. Then we look in each chip’s datasheet to get the exact on-chip flash and PSRAM information for each chip variant. Finally we look in the module’s datasheet to check external flash and PSRAM options and see how they are associated with chip variants.
In addition, the datasheets clarify things at a considerably deeper level than is possible in the summary tables. For example, the S3-WROOM-1 datasheet adds a footnote in its module variant table that says “The modules use PSRAM integrated in the chip’s package”, which clarifies that the summary table was not referring to external PSRAM.
Choosing a Devkit
Devkits are prebuilt PCB boards from Espressif that let you quickly start developing firmware even before your hardware exists. Ideally, you pick a devkit that comes with the module variant you selected so that your development environment is as close as possible to the real hardware. But many modules are available on different devkits. So your devkit selection is ultimately going to be based on peripherals. You need a devkit with peripherals, or connectivity for peripherals, to support the main features you need to develop. Simply scan through the ESP Devkit Comparison Table looking for devkits that support your module and that have the peripherals that you need.
There is one final complication. Espressif names devkits by their board design, but some are available with one of several modules. This means that the name of the devkit is not sufficient to identify what you’ve got. Instead, you need to specify both the devkit and module in order to really know what’s in there. This is especially important for embedded firmware development where it’s easy to find devkits with the same name and chip series but widely different flash or PSRAM sizes. Without some care, you can find yourself with a devkit that doesn’t have enough PSRAM to support your product, or that is overly restrictive during firmware development.
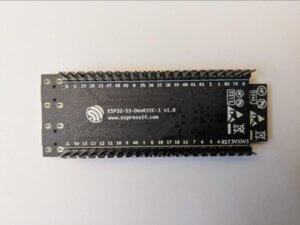
This naming ambiguity means you will need to read both the board identifier and the full module identifier to know what you’re buying or using. For example, the ESP32-S3-DevkitC-1 board identifier is on the back of the board and looks like this.
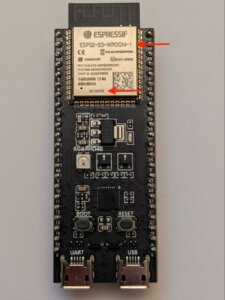
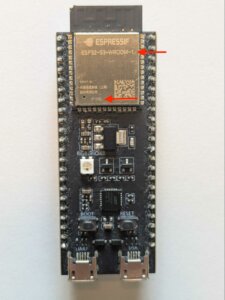
But here are top images of that same kind of S3 devkit with two different ESP32-S3-WROOM-1 modules. You see the name of the module is the same (top arrow). So to tell the difference, you have to read the “fine print” at the bottom of the module (bottom arrow). The first module description includes “N8R8” indicating that it has 8 MB of flash and 8 MB of PSRAM. In contrast, the second module has the same flash but zero PSRAM. Because the devkit and module names don’t uniquely identify the devkit, you will want to be careful when ordering devkits to get the module variant you want.
At this point, you might want to consider choosing a devkit with more flash or PSRAM than is available on your actual product. The argument for this approach is that it can be faster and easier to develop code with fewer restrictions – extra code or data space can be used for development debug support or to store multiple alternatives for testing. Clearly in such a case, the development effort would need to include a phase where resource use is trimmed to fit onto the final hardware. The counter-argument to this approach is the cost and risk associated with that trimming phase – if you are not disciplined in your approach to using the excess resources, then trimming firmware to shave resources can be time consuming and fraught with peril. We tend to opt for developing on devkits matched to the final hardware, but that choice might not be right for your product development.
Summary
Hopefully this quick tour of the Espressif product line has been helpful as you try to wend your way through the selection process. We’ve developed a simple decision-tree to frame your search for the right parts. In short,
- Select a chip – primarily driven by radio requirements and secondarily by processing power.
- Select a corresponding module – primarily driven by available memory (flash and PSRAM) and antenna design.
- Select a corresponding devkit – primarily driven by peripheral support.
Every project is different and we’re sure you’ll find your own additions or improvements to this framework once you dive in. Good luck!